Description
Discover the ultimate thick and chewy peanut butter cookies with this foolproof recipe. Each bite delivers rich, nostalgic peanut flavor in a perfectly soft cookie that stays fresh for days. Made with pantry staples and ready in just 30 minutes, these classic treats feature that signature fork-pressed pattern and satisfying texture that store-bought versions simply can’t match. Perfect for gifting, family gatherings, or enjoying as your own well-deserved moment of sweet indulgence!
Ingredients
- 1 1/2 cups (180g) all-purpose flour
- 1/2 teaspoon baking soda
- 1/2 teaspoon baking powder
- 1/4 teaspoon salt
- 1/2 cup (113g) unsalted butter, softened
- 3/4 cup (185g) creamy peanut butter
- 3/4 cup (150g) packed brown sugar
- 1/4 cup (50g) granulated sugar
- 1 large egg, room temperature
- 1 teaspoon vanilla extract
- 2 tablespoons milk
Instructions
Step 1: Prepare Your Space
Preheat your oven to 350°F (175°C). Use silicone baking mats or parchment paper to line two baking sheets. Having everything ready creates a smooth baking experience.
Step 2: Combine Dry Ingredients
In a larger basin, incorporate the flour, baking soda, baking powder, and salt. This even distribution of leavening agents ensures your cookies rise properly and have consistent texture throughout.
Step 3: Cream the Fats and Sugars
Mix the flour, baking powder, baking soda, and baking powder in a medium bowl. Beat the peanut butter and softened butter together in a large mixing basin until fully incorporated. Add both the brown sugar and granulated sugar and continue beating until the mixture is light and fluffy, about 2-3 minutes. Don’t rush this step—proper creaming incorporates air that helps create that perfect texture.
Step 4: Add Wet Ingredients
Beat in the egg until fully incorporated, then mix in the vanilla extract and milk. The mixture should be smooth and creamy with no streaks remaining. The milk adds moisture that helps create that signature chewy texture.
Step 5: Combine Wet and Dry Ingredients
Gradually add the dry ingredient mixture to the wet ingredients, mixing on low speed just until combined. Be careful not to overmix, which can develop too much gluten and make your cookies tough. When there are no longer any flour streaks visible, stop mixing.
Step 6: Shape the Cookies
Divide the dough into 1.5-inch-diameter balls using a cookie scoop or tablespoon (about 2 tablespoons of dough per cookie). Place them on your prepared baking sheets, leaving about 2 inches between each cookie for spreading.
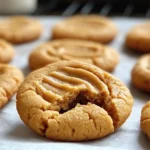
Step 7: Create the Classic Pattern
Using the tines of a fork dipped in sugar (to prevent sticking), press a crisscross pattern into each dough ball, flattening them slightly to about 1/2-inch thickness. In addition to being classic, this famous peanut butter cookie recipe aids in uniform baking.
Step 8: Bake to Perfection
Bake the cookies in a preheated oven for 10 to 12 minutes. The secret to chewy cookies is removing them out when the center looks a little underdone. The edges should be just set and lightly golden, but the centers will look soft and not fully set.
Step 9: Cool Properly
Let the cookies sit on the baking pan for five minutes. During this crucial resting period, they might start to solidify their structure and complete cooking using residual heat. 4. Transfer them to a wire rack to complete cooling.
Notes
Perfect Peanut Butter
For the best texture and flavor, use commercial creamy peanut butter (like Jif or Skippy) rather than natural varieties that can separate. The stabilizers in commercial peanut butter help achieve that perfect chewy texture and consistent results.
Note 2: Don’t Skip the Milk
The 2 tablespoons of milk might seem insignificant, but they’re crucial for achieving the perfect moisture level that keeps these cookies thick yet chewy. This small addition makes a big difference in the final texture.
Timing Is Everything
Remove cookies from the oven when the edges are set but the centers still look slightly underdone (around 10-12 minutes). They’ll continue cooking from residual heat and set up perfectly as they cool, giving you that coveted soft center.
Let Them Rest
Allow cookies to rest on the baking sheet for a full 5 minutes before transferring to a cooling rack. This resting period is when the cookies develop their perfect texture—moving them too soon can cause them to break or become too firm as they cool.
- Prep Time: 15 minutes
- Cook Time: 10-12 minutes
- Cuisine: American